Explore Your Graphical World

Hot

Friday, September 29, 2017

Thinking About Design Thinking: Is It Important?

September 29, 2017
Design thinking is the biggest buzzword in the design world since flat design. Everyone is talking about it… even non-designers. So what is design thinking? Is it important? Should you care?
Here’s the good news: design thinking is something that’s probably part of what you “just do” even if you didn’t have a name for it. Design thinking is another way to think about problem-solving. Let’s take a closer look, and delve into what it means, and why it can be useful!

Design Thinking = Problem Solving

design thinking
Design thinking is just another way to talk about problem-solving. Every design project you take on aims to solve some sort of problem for the client, whether it is helping more people learn about their company through a website, getting people into a store with a coupon or enticing people to buy something with an amazing package design.
But design thinking is more than just problem-solving. It is a hands-on approach to developing solutions.
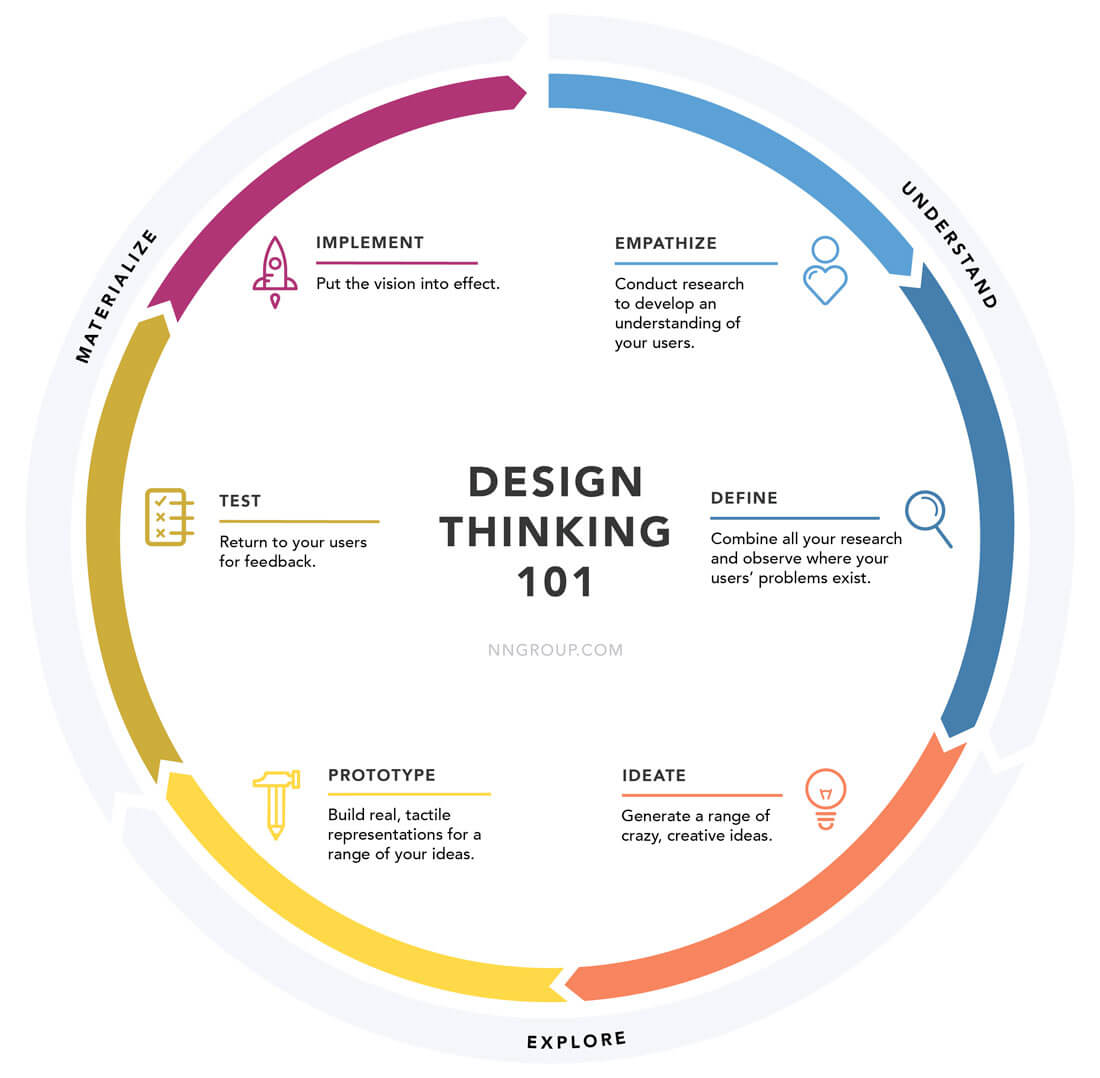
Design thinking breaks all this down into a process of sorts. The Nielsen Norman Group, which studies user experience and does training and consulting, might have one of the best visual representations of design thinking out there. It looks like this:
  • Understand
  • Explore
  • Materialize
Every phase of design falls into one of these main areas. Think about projects you are working on. They start with a design brief or outline (understanding), then you move on to brainstorm ideas and produce sketches or mockups to spur thought (explore) and you finish by taking all that stuff and creating a design to solve the problem presented initially (materialize).
The process can break down even more into six phases within that overall process:
  • Empathize
  • Define
  • Ideate
  • Prototype
  • Test
  • Implement
So why is design thinking new again? Thinkers in other disciplines have grabbed on to the concepts to improve their problem-solving processes. (So it looks like designers were on to something pretty awesome all along.)

History of Design Thinking

While the buzzword is new, design thinking is not.Some of the biggest names in the design world such as IDEO’s Tim Brown (he’s got a blog called Design Thinking) have been talking about it for decades. It’s the basis for Roger Martin’s 2009 book, “The Design of Business: Why Design Thinking is the Next Competitive Advantage.” You can even trace it back to the designers of the Eames chairs in the early 1900s.
The new iteration of design thinking just seems to think about it more consciously. What are we doing in the process of coming up with viable design solutions? And how can we model future projects on past success?

What Does This Mean for Your Work?

Thinking about the way you think and process problems and solutions can help you develop better answers.
When it comes to design thinking and actual design why does this matter? (Especially if we have established that many designers already do this subconsciously?) Because we can be better.
When it comes to designing and creativity, thinking about the way you think and process problems and solutions can help you develop better answers. In essence, you can be a better designer.
Let’s apply the design thinking model to a web design project.
  • Understand: What does the user need, want or expect? Get to know the users that are the target audience for the project. Map them out, create personas and get out and chat with actual users. (Remember, design thinking is a hands-on approach.)
  • Explore: This is the time to get creative. Toss out every wild idea into the open. See what parts stick. Play with it. Create sketches or wireframes that help you better see the idea in action. Share these ideas with the team and see how people respond to them.
  • Materialize: Now go build it. And when you finish, take it back to those users you initially talked to. What do they think? Does it work? Does it solve their problem?
  • Repeat: There’s nothing that says this process gives you a usable answer in the first go round. You might have to go back to any step and try again. Don’t get discouraged. It is OK to fail from time to time.

Why Design Thinking?

design thinking
When it comes to something different, there’s always some pushback. Do you feel the need to sell the concept of design thinking to your team?
The advantages are clear:
  • Design thinking focuses on the end user. You aren’t designing something because it looks good or uses a cool trend or technique, you are doing it to make users happy.
  • Design thinking is rooted in teamwork, where every person brings a level of expertise to the conversation.
  • Design thinking considers the human nature of empathy and emotion, and how these things can be powerful elements in the design. (You can find disaster if you don’t think about the human side of it all).
  • Design thinking encourages testing. Lots of it. Revisions can be the key to success. Don’t be afraid to rethink things.
  • Design thinking solves actual problems. It takes you back to the reason you are designing something in the first place. What are you trying to accomplish? How will you help/educate/delight the user?

Conclusion

You don’t have to change the way you work tomorrow, but you should think about design thinking and how it can impact you and your team. Try the process and see if it helps your brainstorming. Step back and look at how you are already developing ideas; how close to this process are you already?
Design thinking isn’t just a fad that will be gone in another month. It’s gaining traction in other areas – education, science, management, etc. – because there’s something about it that seems to just click. Solving problems in meaningful ways never gets old. (And it’s pretty cool to think designers were at the head of this curve.)
Read More

Saturday, September 23, 2017

Adobe Illustrator CC 2017 Crack 64-bit

September 23, 2017

Download Adobe Illustrator CC 2017 + Crack and enjoy the best drawing material for 2D and 3D design. In addition to that draw any artwork you like by using the most advanced tool such the Perspective Grid tool, and also the painting tool.
Users have such as a big extension to export and import : (PDF, EPS, FXG, PSD, TIFF, GIF, JPEG, SWF, and also SVG). Create design forms and animate objects of as you like.
ADOBE ILLUSTRATOR CC 2017 + CRACK FEATURES:
The first thing that you will notice once you launch the program it’s the high support for Adobe Bridge so you can see whats’ inside any (Ai) file without opening him. In addition to that users have some new features like the Live Trace tool. This tool will help you to convert your images, sprites and also textures to a vector description.
Another tool that Illustrator CC 2017 free download have and Adobe Illustrator CC 2015 doesn’t have it’s the Live Color tools, this new tool manages the colors and also it handles the proportions between the different colors in your project. Another great tool that adobe illustrator free download has it’s the Recolor Artwork tool, a great tool color to adjust brightness, opacity and also the link colors.
                              Download Adobe Illustrator CC 2017 Crack amtlib.dll 
Download Adobe Illustrator CC 2017 Multilingual + Crack (32-bit & 64-bit)
§   
                                                                                        SYSTEM REQUIREMENT :
Title:                             Adobe Illustrator CC 2017 Crack 64-bit 
Manufacturer:              ADOBE
CPU:                            Minimum Intel Pentium 4 or AMD Athlon 64 processor
OS:                               Microsoft Windows 7 /Windows 8.1 or Windows 10
Ram:                            2 GB of RAM  for 64 bit
HDD:                           2 GB of available hard-disk space for installation
size:                             1.89 Gb

                                                              DOWNLOAD HERE


           SEE MY VIDEO IN YOUTUBE TO KNOW HOW TO CRACK ILLUSTRATOR

Thanks

Read More

Monday, September 11, 2017

Amazing 3D Glass Window Logo Mockup

September 11, 2017

Today I have a very nice looking 3d glass window logo mock-up for you to present your logo, icon etc in an amazing way.

Format: Layered PSD

Dimension: 2000 x 1500px

Smart Object: YesPSD Size: 18.5

Requires: Photoshop CS$+

                           DOWNLOAD IT FROM CLICK BELOW HERE


Read More

Wednesday, August 30, 2017

Beautiful Light Burst Text In Photoshop

August 30, 2017
In this Photoshop Text Effects tutorial, we'll learn how to engulf text in an explosion of light and color.We will be using a couple of filters that are not used very often in everyday Photoshop work, but creating the effect is quite simple and the end result is definitely worth the effort.
Here's the result we're going for:

Step 1: Open A New Photoshop Document

Create a new document in Photoshop.I chose the 640x480 size and resolution 300dpi. You Choose your own size.

Step 2: Add Your Text , Resize it and Put it into the center

Step 3: Add A Selection Around Your Text And Save It

"Ctrl-click" (Win) / "Command-click" (Mac) directly on the text thumbnail in the Layers palette.
Your text will now have a selection around it
With the text selected, go up to the Select menu at the top of the screen and choose Save Selection. When the Save Selection dialog box appears, just click OK. There's no need to name it or make any changes to the options.
Once you've saved your selection, press Ctrl+D (Win) / Command+D (Mac) to deselect your text.
Switch over to your Channels palette for a moment (it's grouped in beside the Layers palette) and you'll see your selection saved as a new channel named "Alpha" at the very bottom. We'll be coming back here a bit later to load our selection again.


Step 4: Use "Fill" To Fill Your Text Layer With White And Set The Blend Mode To "

Switch back to Layers palette again, and with the text layer selected, go up to the Edit menu at the top of the screen and choose Fill. When the dialog box appears, set the Contents to White and change the Blending Mode to Multiply.


Step 5: Apply The Gaussian Blur Filter To The Text

Go up to the Filter menu at the top of the screen, choose Blur, and then choose Gaussian Blur. When the Gaussian Blur dialog box appears, enter a Radius value of about 3pixels and click OK to apply a slight blurring to the text.


Step 6: Apply The "Solarize" Filter To The Text

With the text layer still selected, go back up to the Filter menu and this time chooses to Stylize and then choose Solarize. This will turn the document black, and your text will appear as a white stroke.


Step 7: Lighten The Text With Levels

The text is looking a little dark, so let's lighten it. Use the keyboard shortcut Ctrl+L (Win) / Command+L (Mac) to bring up Photoshop's Levels command, and drag the white point slider on the right in towards the left until you reach the right edge of the histogram.Click OK. The text will now appear much brighter


Step 8: Make A Copy Of The Text Layer &Apply The "Solarize" Filter To The Text

 Make a copy of the main text layer. 

Go to the Filter menu, and choose Distort, and then Polar Coordinates. We're going to send our text to the North Pole. When the Polar Coordinates dialog box appears, select the Polar To Rectangular option at the very bottom and then click OK.


Step 9: Rotate The Canvas 90 Degrees Clockwise & Invert The Image

Go to the Image menu at the top of the screen, select Rotate Canvas, and then choose 90° CW to rotate the canvas 90 degrees clockwise.
Use the keyboard shortcut Ctrl+I (Win) / Command+I (Mac) to invert the image, so black becomes white and white becomes black.

Step 10: Apply The "Wind" Filter Three Times & Invert The Image

Go to the Filter menu , choose Stylize, and then choose Wind. When the Wind filter's dialog box appears, make sure Method is set to Wind and Direction is set to From the Right.Click OK to apply the Wind filter. Then apply this effect another twice.
Press Ctrl+I (Win) / Command+I (Mac) to invert the image once again\


Step 11: Apply The "Wind" Filter Three More Times

With the image inverted, need three more times to apply the filter to the image


Step 12: Brighten The Image Again With Levels & Rotate The Canvas 90 Degrees Counterclockwise

We'll let Photoshop do the work for us by using Auto Levels. To do that, press Shift+Ctrl+L (Win) / Shift+Command+L (Mac) to apply the Auto Levels command to the image, which will brighten it up. 
After this Goto, the Image menu, choose Rotate Canvas, and this time chooses 90° CCW to rotate the canvas back to the way it was original.

Step 13: Apply The "Polar Coordinates" Filter Again & Set The Layer Blend Mode To "Screen

Go back up to the Filter menu again, choose Distort, and then choose Polar Coordinates. This time choose the Rectangular to Polar option and click OK.

Go up to the blend mode options in the top left of the Layers palette and change the blend mode of the text copy layer from "Normal" to Screen by clicking on the down-pointing arrow and selecting "Screen" from the list

Step 14: Apply A Gradient Fill Layer To Add Color

Click on the New Fill Or Adjustment Layer icon at the bottom of the Layers palette.Change the blend mode of the Gradient fill layer to "Color"

Step 15: Apply A Radial Blur To The Original Text Layer 

We're done with the text copy layer at this point. We're going to finish off the last few steps by working on the original text layer, so click on it in the Layers palette to select it. Then go up to the Filter menu, choose Blur, and then choose Radial Blur
Set the Amount to about 65 pixels, the Blur Method to Zoom, and the Quality to Best, as circled above, and then click OK to apply the filter to the original text.

Step 16: Load The Saved Text Selection & Fill The Selection With Black

Only a couple of things left to do. First, switch over to your Channels palette (Alpha) again like we did earlier. We're going to reload that selection we saved. To do that, simply right-click (Win) / Control-click (Mac) anywhere on the Alpha channel at the very bottom, which will load the selection back into the document window.
With the original text layer selected in the Layers palette and black still as your foreground color, press Alt+Backspace(Win) / Option-Delete (Mac) to fill the selection with black and finish the effect. Press Ctrl+D (Win) / Command+D (Mac) to remove the selection, and you're done! After all that, here's the final "light burst" text effect.
The final "Light Burst" effect
More Tutorial are Comig. Never Forget to visit My Fiverr_Id And Behance_Portfolio
<<<Leave A comment for any Question>>>


Read More

Essential Elements Of Logo

August 30, 2017

Logo Design Essential Elements: Knowing the key elements of a memorable logo and how they work will help to communicate properly with your eventual logo designer, but also to make a proper final choice on the logo that represents brand the best. To begin with, a logo is not just some colors, fonts and lines combined. It is a brand’s identity, to the extent that a logo is usually more recognizable than the brand’s name. A good logo, with the right characteristics, will increase your visibility and credibility – which means 
more business


1. The Graphic Element | Logo Design Essential Elements


The graphic element in a logo can be an icon, a pattern, an illustration or even a designed line. Whatever its shape, the graphic element is always versatile. It needs to be able to match with the entire logo and stand alone as the single symbol of your brand. The elements of graphic design are used, and often mixed together, to create graphic works. They are not to be confused with principles of design, such as balance or white space, but rather the elements such as color, fonts, and images. A powerful graphic can make or break a design.


2. The Font Logo Design Essential Elements

Font choice is the most important element of logo design and one that should never be neglected. The right font can increase the strengths of your logo and your brand, while the wrong font can be a customer buzz-kill. Choice of font plays a critical role in your brand’s logo design and overall brand identity, especially in water mark logo design, where the type is your logo. Custom fonts help ensure that your unique logo will stay that way forever.


3. The Color | Logo Design Essential Elements


Color is always the most obvious thing about a design. We’re taught colors from early stages, and even go so far as to identify some of our personal belongings with color descriptors. Color is capable of creating strong feelings among people, who consciously and subconsciously apply certain meanings or emotions to various colors. Color is utilized to generate emotions, define importance, create visual interest and unify branding. So most importantly, the color scheme of your brand and your logo should be based on what resonates best with your target audience.

4. The Shape | Logo Design Essential Elements

The shape is basically an area that is contained within an implied line or is seen and identified due to color or value changes. Whether it be geometric or something more organic, a recognizable shape is memorable long after it leaves our view. Geometric shapes are simple to recognize and stand for organization, efficiency, and structure. Further, the symmetry of geometric shapes stands for order.


5. The Form | Logo Design Essential Elements


Forms are simply the three-dimensional objects within a certain design. The simplest forms are: cube, pyramid, cylinder etc.

Forms and shapes can be visualized as positive or negative. In a two dimensional composition, the objects provide the positive forms, while the background is the negative space. For starting art and design students, effective utilization of negative space is by far the most important concept to be mastered.

Read More

Why are so many conpanies changing their logos to flt design?

August 30, 2017

Flat designs have spiked significantly in the past few years, in brand identity redesigns of some of the biggest players in the corporate world.
Major brands like Apple, Microsoft, and Hershey have gone flat I would say it’s here to stay, at least for a while. It’s a heated debate in graphic design communities, and here’s why.
Minimal but not Boring
Ease of Use
Flat designs are easy to use on different platforms
Flat designs are battery savers
Flat designs are easy to design
Three-dimensional designs, as we know, are created in such a way that they have a live 3D effect to it. Flat designs on the other hand, as its name suggests, are the designs that are flat in nature with no gradients, shadows, or texture. These designs are simple and minimal with no three-dimensional effects added to the design. There are a lot of reasons for which companies have shifted from 3D designs to flat ones.


A very obvious reason to the shift is the fact that the market is doing so. Companies and brands wish to appear updated and fresh and hence, the change is vital to be made. If not given due attention, in this regard, the brand would be whipped out from the market.
Another reason for the shift to flat design is the fact that 3D logos have a lot of gradients, shadows, and gloss making them almost impossible to match with the different platforms, on which they have to be placed, without alterations. On the other hand, flat designs are simple yet colorful which allows them to look good on all platforms with no or less alteration required.
Also, since, the flat designs encompass lesser colors and details; they are good at saving battery. The space saved hence can be utilized for the showcase of relevant and more attractive items.
Finally, in this world of ease and comfort, designers too wish for a task that gives them room for relaxation. Hence, designs that are high in quality and low in efforts are the most cherished ones. Flat designs, precisely accommodate these features while being easy to make and attractive enough to steal the show.

You can check my logo gig on FIVERR Linkedin
Read More